Monday, October 31, 2011

October Snow?!

I have a real distrust for weather men. They have been proven wrong far to many times. When they start saying crazy stuff like several inches of snow in October, I won't be found running to the store for bread and milk. (Not to mention we don't buy bread and milk at the store any day of the year!)


But I may have become a believer, at least this one time. Like the rest of the east coast, we were dumped with cold white stuff that looked surprisingly like snow in October.


We had not even had a frost yet. The leaves have not fallen off the trees. Only a few days ago, my children were insisting on going barefooted outside. I thought the ground would be too warm for the snow to pile up. But it did.


Not a lot. But plenty for the children. They were absolutely ecstatic. Best of all, it was a Saturday. That means Dad was home and I wasn't forced to go out and play with them. Yes, I took photos from the doorway in the warmth of the house.


I could think of far better places to be than freezing my toes in slushy snow. Don't get me wrong, I love snow. It makes the world absolutely beautiful. I just like to enjoy it better from the indoors.


The children made two tiny snowmen themselves, then Ed helped them make a big snowman. I told the children to remember this day to tell their grandchildren they once made a snowman in October.


Then they joined Mom in the enjoyment of the fireplace. Ed says that the hours of work on this fireplace are beginning to be paid off. Thankfully, we didn't lose our power like many others.

Today, the snow if rapidly melting, leaving behind only a pile of snow gear, frozen flowers, and warm memories.

Thursday, October 27, 2011

Molasses Cookies

Molasses Cookies are good any time, but especially in the fall. I have tried many recipes in search for the perfect soft molasses cookie. Ed says this one was the winner.

I like the strong molasses flavor in these cookies, if you want milder flavor, cut back the molasses and replace with sugar. But, I'm told, that molasses is high in iron, so you can eat these cookies and pretend they are good for you!

Molasses Cookies

1 1/2 cup butter
1 1/2 cup brown sugar
1 cup molasses
2 eggs
4 tsp baking soda
1 tsp salt
1 tsp cloves
1 tsp cinnamon
1 tsp ginger
5 1/2 cup whole wheat flour

Mix butter, sugar, molasses, and egg together. Beat well. Mix in dry ingredients. Cover and chill for at least one hour. Roll into 1 inch balls and roll in sugar. Bake at 375 for 8 minutes.

Tuesday, October 25, 2011

French Toast

I loved french toast as a child, but only when I found this french toast recipe recently did I fall in love with it as an adult.

This recipe is about as healthy as the bread you choose. I don't particularly like it with sourdough bread, though a mild sourdough is okay. But a loaf of whole wheat bread is perfect. French toast is a great way to use up stale bread.

French Toast
from Mennonite Girls Can Cook


1/2 cup flour (I use whole wheat.)
2 T sugar (I replaced with 1 T honey.)
1/2 tsp salt
2 cups milk
6 eggs
1 loaf bread, thickly sliced

Blend all ingredients together except bread, of course. Dip the bread slices in the batter one at a time, turn them over, and allow to soak for a few moments to absorb.

Fry slices until browned on both sides. Serve with your favorite pancake topping.

Monday, October 24, 2011

Deterring Fruit Flies

Flies, mosquitoes, gnats, ants - we've battled them all summer but with cooler weather, apparently they disappear. But another little visitor takes their place, fruit flies.

Fruit flies hover around any fruits (surprise) and vegetables. I can usually keep them under control by storing fruit in the fridge and promptly taking the peelings to the compost pile.

But this year, they decided they liked sourdough. I can't put it in the fridge if I want it to grow. I can't seal it up air tight. I have neglected my sourdough in the last months and was finally getting back into the baking with sourdough. I didn't want a tiny insect to defeat me.

My sister works at a candy store. With all the caramel apples and chocolate covered strawberries, fruit flies are a major problem. Their solution? Fresh basil!

My basil plant is almost dead, but I snipped off a few stems, laid it by my sourdough pot, and no more fruit flies!

I love when solutions are so simple.

Do you have any good tips for deterring fruit flies?

Saturday, October 22, 2011

3rd Anniversary

 I had not really been thinking about it, but this week marked the third anniversary for this blog. I didn't plan any celebration - but I do hope to host a giveaway next week. I won't spoil the surprise, but we are enjoying some wonderful fragrances at our house.

I didn't want to let the opportunity slip by to thank all of you for stopping by Home Joys. I also noticed this week that the number of subscribers has doubled in the last two months. I am honored that so many of you take the time to visit, comment, and enjoy this little corner of the web. If you want to join the subscribers, sign up by email or feed reader on the right column.

In the past few weeks, I had the privilege of meeting several of you in person. I admit to a few butterfly flutters whenever a lady walks up to me and says, "I think I read your blog." I find a bit of security behind the a computer screen. To learn that a stranger knows me well enough to pick me out of a crowd is rather intimidating. But I love learning to know the smile behind a reader's name and your words of encouragement  inspire me to keep writing.

Thanks so much for the dozens of ways you have blessed my life in the past three years!

Friday, October 21, 2011

New Ways to Make Pizza

I have a problem, an obsession, a dysfunction.

I'm never completely satisfied with a recipe. No matter how many times I make the same recipe, I'm convinced I could still make it better, healthier, tastier.

And there is always the possibility that a better recipe exists out there that I have not yet tried.

There is no way of counting how many pizza crust recipe I have tried over the years. We eat pizza weekly, which gives many opportunities to make pizza crust. When someone starts a conversation with "I tried your pizza crust recipe..." immediately my mind is leaping to wonder which pizza crust recipe I was excited about at the time I gave her the recipe.

Typically, no matter what recipe I try once or twice, I always come back to my Mom's tried and true pizza crust recipe. After finding a way to turn the recipe to 100% whole wheat and crisp up the bottom crust, I liked this recipe even more.

But my recipe dysfunction is still alive and well. I knew there was more options to try.

One of those was baking on a stone. I have always heard that stone baked pizza was the best. Period. I found a baking stone and a pizza peel at a yard sale but they sat in the cupboard. I was too intimidated to try.  Until this fall when my friend Nola gave me her recipe for pizza crust that they bake in their grill on a stone.

I adapted the recipe, first adjusting the size for a larger batch for our family, then replacing the sugar with honey and the white flour for whole wheat and decreasing the total amount of flour. By now she probably wouldn't even want her name to be put to this recipe and I'm sure her original tastes better, but this version works for us.

Pizza Crust


1 1/2 cup warm water
4 cup whole wheat flour
1 T olive oil
2 tsp honey
2 tsp salt
2 tsp yeast
cornmeal

About an hour or two before you plan to eat, mix all ingredients but 1/2 cup flour and cornmeal. Allow to rest for five minutes. Knead five minutes adding additional flour if needed. Rise for 1-2 hours.


If using a stone, preheat in 550 degree oven. Sprinkle peel generously with cornmeal. If you don't have a peel, use the back of a baking sheet. It works just as well, just doesn't look as cool.


Divide your dough into however many pieces you wish. I like to make three 12 inch pizzas. Roll out your dough and place on peel.


Add toppings as desired.

Slide pizza onto hot stone in oven - or bake on a baking sheet or pizza pan. Bake at 550 degrees for 5-7 minutes.


Ask us in a year what pizza crust recipe I'm using. But for now, this is our all time favorite!

Thursday, October 20, 2011

Still picking berries!


I thought strawberries were my favorite thing to grow. But red raspberries may be moving to first place.

I have no idea when we started picking them. I really should keep better records. They did struggle during the summer with the dry weather. The berries were few and small.

But with all our fall rains, they are now big, juicy and abundant!


I only have about eight plants, but we plan to extend the row next year. Rarely do the berries make it to the house. They are normally snacked on right off the bush.

But last week I was able to pick a pint and save them for muffins. Yummy! It is a thrill to pick fresh fruit from our garden in late October.


And maybe, best of all, the plants are perennial, take almost no care, and have few pests other then some beetle damage to the leaves and bees who love the berries as much as we do! Oh, well, they need to eat, too!

Besides red raspberries, we also have yellow raspberries which are also doing well. Our blueberry plants are trying to die, and succeeding. The blackberry plants have not decided to take off yet, hopefully next year. All of our berry plants are only a year or two old, so we are still learning.

Do you grow raspberries? Is it usual to have them this late in the season?

Wednesday, October 19, 2011

Egg Puff

We love breakfast, and not just any breakfast, but a real cooked breakfast.

Maybe it comes from Ed and I both growing up on dairy farms. By breakfast time, some members of the household had already been up for hours milking and feeding cows.

Whatever the cause, since we were first married, no morning is too harried to not include breakfast. Occasionally, cold cereal will suffice, but on those days we are all thinking about lunch by 10:00. I have found that we all have a better morning if we have a breakfast that contains protein and whole grains.

If you are not accustomed to eating breakfast or if cereal or fruit is your usual breakfast (quick sugar rush but no lasting energy source) I'd encourage you to give breakfast a try. It may take your body time to adjust to eating right away in the morning. But you should be able to adjust your other meals to eating less if you give your body good fuel to work on throughout the day.

I'll be sharing some of our favorite breakfast recipes this month. The first is a recipe that my grandparents served at their bed and breakfast. I love that it is very adaptable to any taste and whatever is in the fridge. But best of all, all the prep can be done the day before. In the morning, all I do is slide it in the oven, set the table, and call the children!

Egg Puff


6 slices bread
2 cups milk
6 eggs
1 tsp salt
1 cup cheese

Options:  sausage, ham, bacon, peppers, onion, mushrooms, etc

In greased 9x13, place torn pieces of bread. If meat is desired, fully cook or brown. Sprinkle desired meat or veggies on bread. Beat eggs, milk and salt together. Pour over bread. Top with cheese. Sprinkle with other seasonings if desired. (Maybe basil, or rosemary?) Cover and refrigerate overnight. Bake at 375 for 30 minutes.

Tuesday, October 18, 2011

Hearty Grain Bread

I haven't shared any bread recipes recently. Fall finds me in the baking mood again. This recipe is full of the chewy nutty stuff I love in a bread to share with a bowl of soup! While the recipe calls for white and whole wheat flour, you can easily substitute all white or all whole wheat flour.


Hearty Grain Bread
Adapted from Recipes from the Old Mill


4 cups water
1 cup rolled oats
1 cup raw bulgar
1/2 cup butter1/2 cup honey
3 T yeast
3 cups whole wheat flour
1 cup sunflower seeds 
2 T vital gluten (optional)

1 T salt
4-5 cups white flour


Bring water to boil. Pour over oatmeal and bulgar. Add butter. Cool to lukewarm.
Add honey, yeast, whole wheat flour, sunflower seeds, vital gluten, and salt. Mix well.
Add 4 cups white flour. Mix well. 
Allow dough to rest for five minutes. Stir, adding additional flour if needed.
Knead for about 10 minutes until soft and elastic dough.
Cover and rise until double, about 1 hour.
Punch down and divide and shape into loaves. This makes four sandwich loaves or three long braided loaves or many smaller loaves.
Brush with beaten egg. Garnish with rolled oats.
Allow to rise for about 1 hour.
Bake at 375 for 15-30 minutes depending on size and shape of loaf.

Monday, October 17, 2011

Caramelized Onion - Potato Gratin

With cooler weather comes a desire for comfort food. And this potato recipe is pure comfort food to me. I can't eat only one serving of this onion and potato dish!


Caramelized Onion - Potato Gratin


1 1/4 cup bread crumbs
1/4 cup chopped fresh parsley
3 T Parmesan cheese
3 T butter
2 larger sweet onion, sliced thinly
3 garlic cloves, minced
3 T flour
3 1/2 cup milk
2 tsp salt
1 1/2 tsp Italian seasoning
1/8 tsp red pepper
8 oz shredded cheese
3 lb potato, peeled and sliced

 Mix bread crumbs, parsley, and Parmesan together and set aside for topping.

Cook onion in butter for 15 minutes. Add garlic, cooking one more minute. Add flour and cook for one minute. Stir in milk and seasonings, whisking often until thick. Remove from heat and stir in cheese.

Layer potatoes and sauce in greased 9x13 pan. Bake at 375 for 1 hour and 15 minutes. Let stand for 10 minutes before serving.

Saturday, October 15, 2011

Pillowcase Dresses


This week a group of friends got together for a pillowcase dress party. With a little ribbon and binding, a pillow case was turned into an adorable little dress.


I didn't hear the final count, since I left while the others were still going strong, but a dozen ladies created 30 + dresses.

These dresses will be shipped overseas. I can just imagine the delight of a little African girl to receive a new dress.


Want to join the fun? You can find many tutorials and directions for pillowcase dresses online. This would be a great project for mothers and daughters to do together.

Wednesday, October 12, 2011

First Attempts at Dehydrating

I'm having so much fun with my new dehydrator.


So far I've dehydrated more herbs, lots of apples, peppers and onions.


The children are loving the apples. I think most of what I dried are already gone. They were perfect for stuffing in a pocket for a hike.


As usual, my onions were starting to go bad.


Dehydrating them will hopefully give me some onions over winter.


I blended them to add to soups and casseroles.


I am amazed at how much less space dried vegetables take.


I started with a sink full of colorful peppers,


chopped them up, dehydrated them,


and they all fit in a pint jar!

For those interested, the dehydrator I was given is similar to this one. (You can click on the picture to get more info from Amazon.)

I have been very pleased with the speed and the ability to choose different temperatures.
But now I need help. I know how to use dried herbs or apples, but how I do I use something like dried peppers? Should I soak them in boiling water before cooking with them?

I'd appreciate any information you can give on dehydrating, especially on re-hydrating. If you have written about it or know where to find good web info, I'd love if you share the link!

Tuesday, October 11, 2011

Applesauce and the Blame Game

I was in a frantic scramble to turn apples into sauce before any more rotted. The clock was ticking, my time limited, and each movement needed to count.

A row of jars stood on the counter, awaiting lids. As I stretched to reach over the jars, one jar toppled. Applesauce splashed across the counter, down my dress, dripping to the floor.

I looked quickly for broken glass and grabbed a towel to stop any further mess. Although grateful to find the jar unbroken, I found myself looking around in irritation.

But I was alone. No one was in the kitchen but me. With shock, I realized I was searching for someone to blame. I shudder to think what words would have escaped if the usual bevy of children had been at my elbow. I heard their happy voices playing in a nearby room. This time, there was nothing but my own clumsiness to blame.

For the next several hours, while washing apples, stirring pots, squeezing sauce, and scrubbing pans, I had much to ponder. How often do I lash out at my helpers when an accident happens? Do I always blame others in times of difficulty, big or small? Do I never stop to consider that maybe I am the one to blame?

The reaction is as old as our Grandmother Eve. I blame the serpent. The children You gave me. My husband. Or the house, the weather, my aching back, the economy, her, him, them, it...endless the things, people, and circumstances at the focus of my anger.

What if I turned my accusing finger inward? If I said, "I have sinned. I was impatient. I knocked over the jar. I spoke unkindly. Please forgive me." Would my heart then be lighter, the burden lifted? If I turned my frustrations into songs of joy, would I find the “joy of the Lord is my strength”? Could I carry my burden, the endless tasks, the time limits, the uncomfortable circumstances to my Father and there find the promised rest?

Some days it seems impossible to find the time to sit at Jesus' feet, this needful thing that Mary chose. But I can choose to spend time in His Word and tune my heart to His voice. If I want to stop blaming my circumstances, I need to start working on the person I can change.


Then when applesauce spills, may only loving words escape.

Monday, October 10, 2011

Saving Flower Seeds

Guest Post by Regina 

Sunshine!!  Oh THANK-YOU God!!  I feel like a bear coming out of his hibernation into the glorious warmth and happiness of the sun.  I WANTED  to be outside, I HAD to be outside, I NEEDED to be outside, and so outside I went!  I started to work amongst my flowers and realized this would be the perfect day to do something I needed to get done before the first frost.  I would collect seeds from my flowers for the next year.  This is a job I love, to look deep amongst my flowers and find those fat and full seed pods that would supply me with bright, cheerful flowers next year.  I gathered my Ziploc sandwich bags and a marker and started my treasure hunt.  

This is a seed pod for petunias.  You need to look for a pod with the flower petals gone and the pod needs to have turned brown.  Some pods are still green and the seeds will not be dry enough in those.  This one was just perfect!


I snapped the stem, and pulled off the remaining leaves. 
                                

I then place it inside my Ziploc bag and gently squeezed it open.  The pod can be tight and sometimes I need to use my fingernails to gently pry the pod open.  Some pods will already have cracked open and the seeds gone, or some pods may still have a few remaining seeds that haven’t yet spilled out.  I was delighted to find this pod still tightly closed.  All the seeds inside were mine!  These seeds are VERY tiny, so be careful!  One pod has lots of seeds inside. 


Make sure to mark the bag what flower seeds you have and what color.  I have found with some petunias being hybrids, not all the seeds I saved would be the same color when they bloomed the next summer.  Most of the times, they are.  But I have had a few go back to white or sometimes they will be white with the hybrid color stripped through the white, making a very pretty petunia.  

Next was my impatiens.  These pods when they are ready to pick, are a shiny, fat, green pod. 


Now comes the fun!  These little guys are a blast to pop!  I enjoy popping them just for the fun of watching them!  My three year old was helping me hunt for the pods and she had so much fun popping these little guys open.  They are spring loaded, so watch out!  The fattest, really ripe pods, when I barely touched them, literally gave a “pop“, and all the little seeds came spraying out!  Make sure you put the pod in your bag before you pop them so you do not loose any seeds.  Here is what the pod looks like after it is popped.
                                

Don’t sneeze!  Or those tiny seeds will blow away!  Mark your bag with the color and the name of your flower!  

Zinnia seeds are very easy to collect.  Find a brown dried flower head of the color you want to save.


Now gently tear off the top dead petals. 


Underneath these petals are the brown seeds.  These seeds are nice and large!  You don’t need to worry about sneezing these away!


Save marigold seeds exactly the same way.  Marigold and zinnia seeds are one of the easiest to save and start again next year.  I like to sow my zinnias in a row in my garden and like a variety of colors, so I make sure I save at least on or two heads of all the different colors and mix them together in my bag.

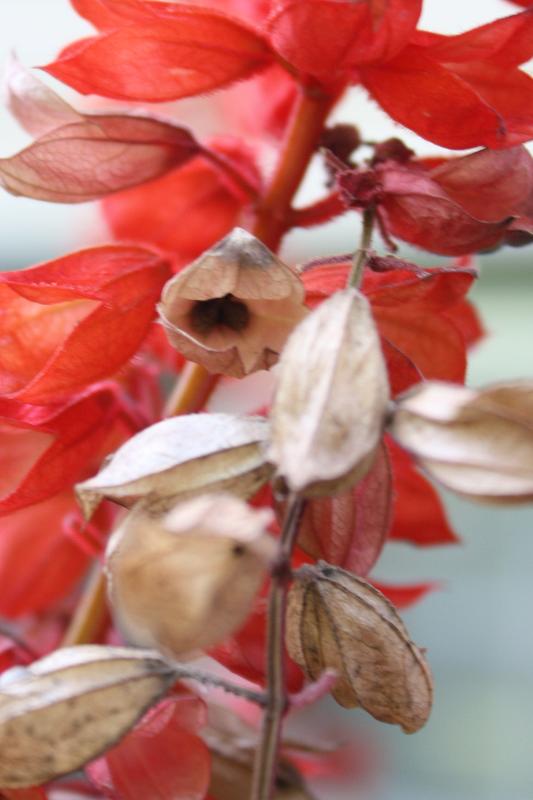
I also grow a lot of red salvia.  I can’t always find the large 16 - 20 in. plants, so I usually start my own.  Look for stems on your salvia plant that has flowers that turned mostly brown.


Do you see those black spots deep in the bottom of the brown flowers?


That is your seeds you want to collect.

Some of the seeds will have already dropped out of the flower, others will be nicely full.  There is usually only around 3-5 seeds per flower.  I pick a whole stem that is brown, put it in my bag and run my fingers along the stem, scrapping the flowers off into the bag.  Then you can tear each individual one open and drop out the seeds or sometimes by gently shaking the bag, the seeds will work their way out of the flowers. 


These seeds look larger than they actually are.  Once again, make sure you mark your bag along with the height of the plants.  I save seeds from two different heights of plants.  Next year you don’t want a 16” plant where you wanted an 8”!

Hopefully this will give you an idea of how to collect seeds from your plants!  These are some of the main flower seeds I collect for the next year, but if you have other flowers, look at them closely and you should be able to find a pod or seeds that you can save. 


Now you need to dry your seeds so they do not become moldy or sprout before you plant them!  Open the bags, roll down the tops so the tops are nice and wide open.  Let them sit in a cool, dry place until the seeds feel nice and dry and should be mostly brown.  Maybe gently stir or shake them around several times so they can all dry.  This can take up to several days.  When they are all dry, reseal your bags and store them where its dark and cool.  

Another way to dry your seeds and probably the best way, is to spread them out on a small plate.  Let them air dry for several days, and then place back into your bags.  The drawback is when I have a lot of bags with seeds, this is a lot more work and it is easier to get my seeds mixed up or spilled!
                                     

Presto!  You are done!  You have just saved yourself several dollars worth plus shipping and handling!  Now come January and February when the snow flies and the winds howl,  you don’t have to wait for the seed catalog to come in the mail.  You can get out your petunia and impatient seeds, and have fun starting them in your flats!  It will bring cozy memories of that sunny, warm, blue sky day when you collected your seeds, and it will bring more cheerful memories of those spring days to come filled with bluebirds and tender new growth of life! 

Linked to Tuesday  Garden Party

Friday, October 7, 2011

Apple Cake

There is so many apple cake recipes, but this is one of our favorites. The glaze on top adds a special touch.


Apple Cake
From Simply in Season

5 cups chopped apples
1 1/3 cup sugar (I cut back to only 1 cup)
1/2 cup oil
2 eggs
2 tsp vanilla
1 cup whole wheat flour
1 cup flour
2 tsp baking soda
2 tsp cinnamon
1 tsp salt
1 cup nuts (optional)

Combine apples and sugar. In bowl, mix oil, eggs, and vanilla. Stir in dry ingredients. Add apples. Pour in greased 9x13 pan. Bake at 350 degrees for 50 minutes. (It only took my cake about 35 minutes.)

Topping (optional)

2/3 cup brown sugar
1/4 cup milk
1 T flour
1/3 cup powdered sugar

While cake bakes, heat brown sugar,  milk, and  flour until  boiling. Remove from heat, mix in  powdered sugar. Drizzle over hot cake.

Thursday, October 6, 2011

Cookbook Challenge - Simply in Season

Problem 1 - I have a shelf full of cookbooks that I've barely used.

Problem 2 - I've been lacking inspiration in the cooking department.

Problem 3 - I've seriously dropped the habit of menu planning, and desperately need to get back to it. I hate the afternoon panic attack of "What are we going to eat tonight?"

I'm hoping to cure all three problems by starting a personal cookbook challenge. My goal is to pick one cookbook on my shelf each month to really dive into, try some new recipes, and hopefully find some new favorites.


For the last month, Simply in Season has been a standby on my kitchen counter. I love how this cookbook is organized by seasons. Flipping to summer found many ways to use my garden bounty.

My goal isn't to talk you into purchasing a new cookbook, but to encourage you to use what you have. But since I know many of you have this cookbook, I'll share a few of the recipes that have been winners at our house.

Focaccia - pg 90
Zucchini Garden Chowder - pg 95
Fahita - pg 148
Chicken Caccciatore - pg 147
Pesto Pizza- pg 123
Stacked Vegetable Quesadillas - pg 134
And that is just in the recipes I've tried recently in the summer section.

In the past, I shared the recipe for Roasted Summer Vegetables and Great Green Vegetable Pasta.
Some of the summer desserts we enjoyed were whole wheat peach kuchen,  fruit platz, yogurt fruit pie, and fruit custard pie.

But since we are now into fall, I'll share a recipe from the fall section of Simply in Season - Apple Cake. But that will wait until tomorrow.

This month, I'm sitting my crockpot on the counter and diving into Not Your Mother's Crockpot Cookbook.

I'd love to hear about your favorite cookbook!

LinkWithin

Related Posts with Thumbnails